A high-resolution photo can look excellent and still be much larger than it needs to be. That becomes a problem when the image is added to a website, attached to an email, uploaded to a property portal, or shared as part of a portfolio.
The solution is not always to reduce the image dimensions. In many cases, you can keep the same width and height while lowering the file size through compression.
This guide explains how to compress a 4K image without losing noticeable quality, which settings to use for different formats, and how to process large images privately with ToolMint.
Quick answer: Open the ToolMint Image Compressor, add your JPG, PNG or WebP image, choose Auto or Balanced, leave the resize fields empty to keep the original dimensions, and download the compressed result. Files are processed locally in your browser and are not uploaded to ToolMint servers.
What counts as a 4K image?
The term 4K image is used loosely outside video production.
For displays and video, UHD 4K normally refers to 3840 × 2160 pixels. Digital photos do not always use that exact aspect ratio. A phone or camera may produce files such as:
- 4032 × 3024 pixels
- 4000 × 6000 pixels
- 6000 × 4000 pixels
- 7680 × 4320 pixels
In practical search terms, people often use “4K image” to describe a high-resolution image that is approximately 4,000 pixels wide or larger.
The important distinction is this:
- Resolution describes the pixel dimensions.
- File size describes how much storage the file uses.
Two images can have identical dimensions but very different file sizes because of format, quality settings, visual complexity, metadata and previous compression.
Can you compress a 4K image without changing its dimensions?
Yes.
Compression and resizing are separate operations:
- Compression re-encodes the image to reduce the amount of data required to store it.
- Resizing changes the number of pixels in the image.
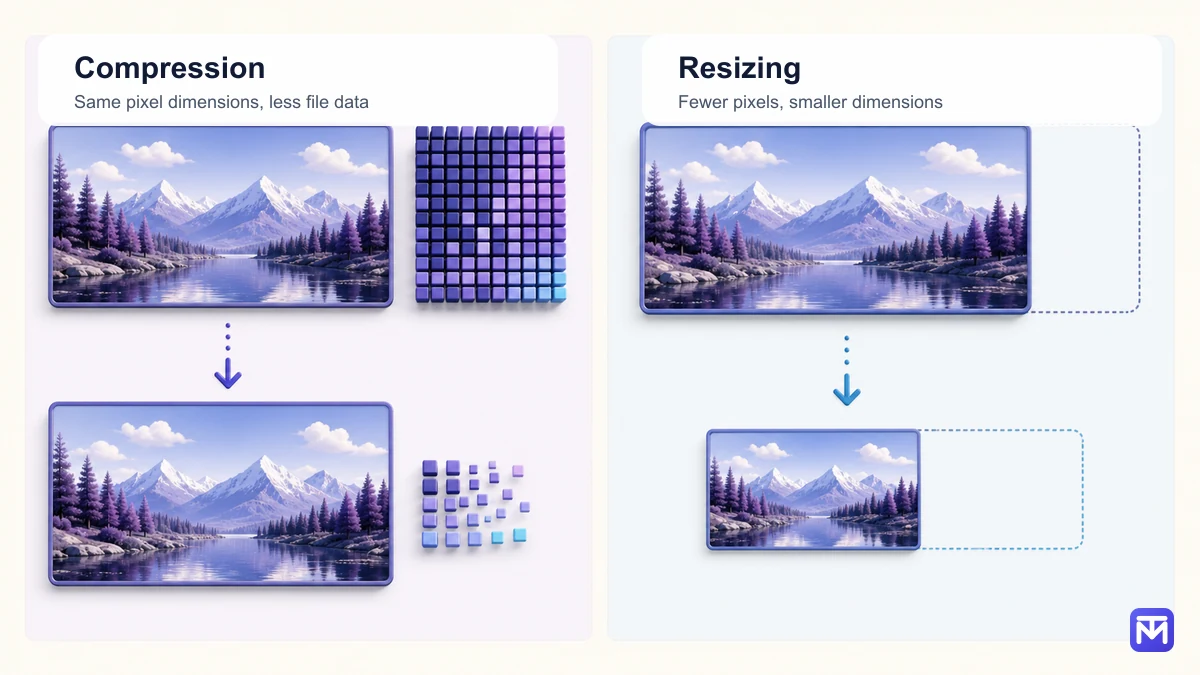
A 6000 × 4000 photo can remain 6000 × 4000 after compression. The file may become smaller even though its dimensions stay unchanged.
This is useful when a platform requires high-resolution files but also enforces an upload-size limit.
However, keeping the original dimensions is not always the most efficient choice. A 5000-pixel image displayed inside an 800-pixel website container still forces the browser to download more image data than necessary. For website publishing, the strongest workflow is usually:
- Resize the image to its maximum required display size.
- Choose an appropriate format.
- Compress the final version.
- Test the page after publishing.
Use the ToolMint Image Resizer when the dimensions are larger than the final use case requires.
Why large 4K images create problems
Slower website loading
Large images increase the number of bytes a browser must download, decode and display. This can be especially noticeable on mobile connections.
A large hero image may also affect Largest Contentful Paint when it is the main visible element near the top of the page. Image compression does not guarantee stronger rankings, but it supports a faster user experience and a healthier technical-performance foundation.
For a broader performance workflow, read ToolMint’s Core Web Vitals guide.
Failed or inconvenient uploads
Email services, content-management systems, recruitment portals, marketplaces and property platforms often impose file-size limits. A high-resolution image may exceed those limits even when the platform accepts its dimensions.
Compression can make the same image easier to:
- attach to an email;
- upload to a website;
- add to a real estate listing;
- include in a presentation;
- share with a client;
- store in a cloud folder.
Higher bandwidth and storage usage
A single oversized image may not seem important, but the effect multiplies across product galleries, blog archives, portfolios and media libraries.
Smaller files reduce storage use and lower the amount of data transferred whenever the image is viewed or downloaded.
How to compress a 4K image with ToolMint
ToolMint’s Image Compressor works with JPG, JPEG, PNG and WebP files. It supports up to 20 images per batch, with a maximum file size of 25 MB per image.
Step 1: Add the image
Open the free Image Compressor.
Drag the file into the upload area or select it from your device. You can add one image or process a batch.
Step 2: Choose a compression mode
ToolMint provides five controls:
- Auto — a sensible default for general use.
- Max compression — prioritizes the smallest file and may introduce visible quality loss.
- Balanced — aims for a practical balance between size and visual quality.
- Best quality — keeps more detail but produces a larger result.
- Custom quality — lets you set the quality manually for JPG and WebP.
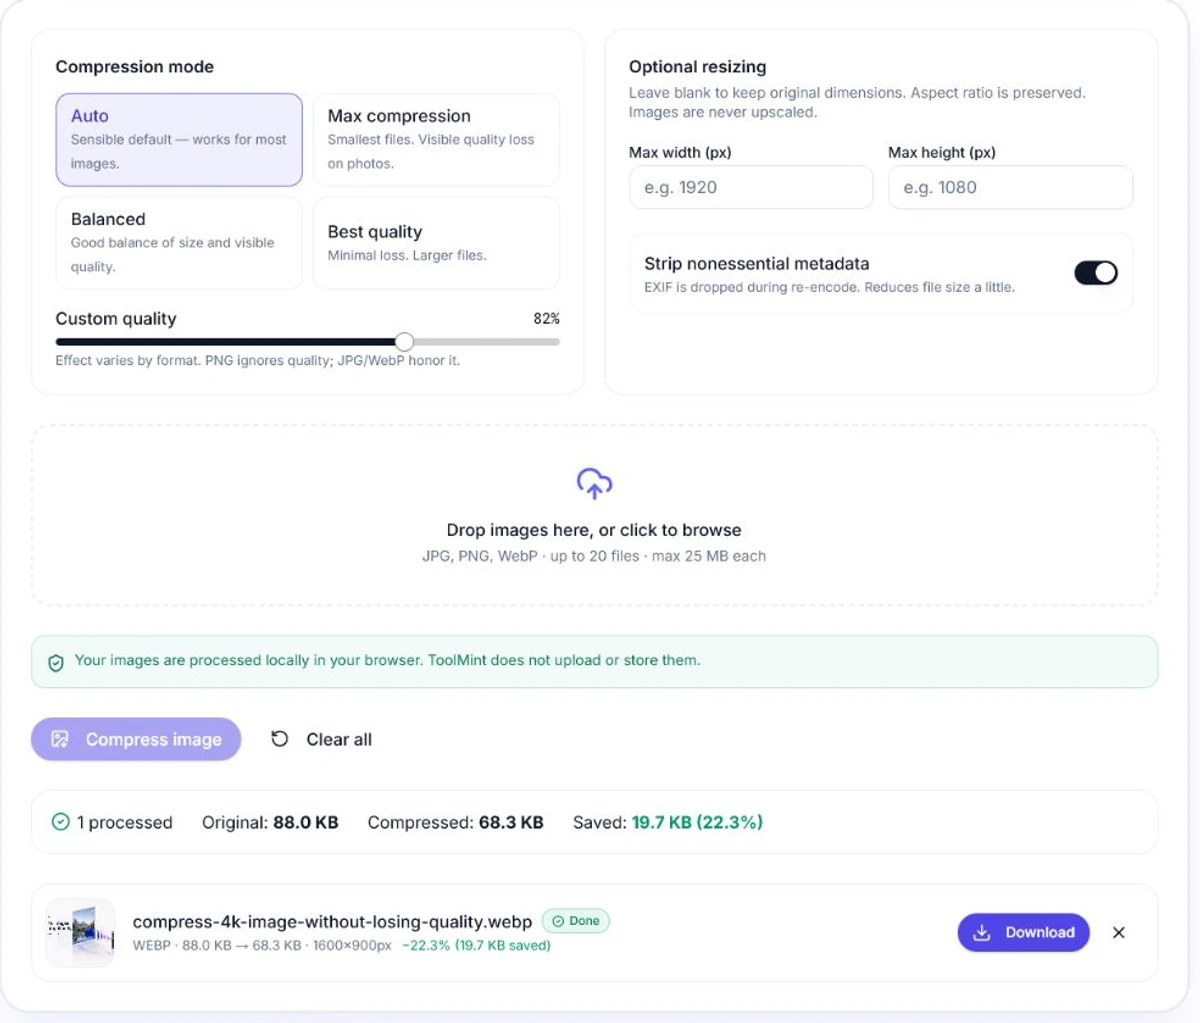
For a 4K photo, start with Auto or Balanced. Use Best quality when fine detail is more important than reaching the smallest possible file.
Step 3: Decide whether to keep the original dimensions
Leave Max width and Max height blank when you need to preserve the existing resolution.
Set a maximum width or height when the image is larger than its final display requirement. ToolMint preserves the aspect ratio and does not upscale smaller images.
Step 4: Choose whether to strip metadata
The tool can remove nonessential metadata during re-encoding. This may reduce the file size slightly.
Keep an original copy when metadata such as copyright information, camera settings or color-profile data is important to your workflow.
Step 5: Compress and download
Select Compress image and review the result.
You can download files individually or use the ZIP option for a completed batch. ToolMint keeps the original file when re-encoding would make the result larger.
Recommended settings by use case
There is no universal quality setting that works for every image. A detailed property interior, a screenshot with text and a simple thumbnail behave differently under compression.
Use the following settings as starting points:
| Use case | Suggested format | Starting approach |
|---|---|---|
| Website hero photo | JPG or WebP | Balanced, then review at final display size |
| Blog image | JPG or WebP | Auto or custom quality around 80–85 |
| Product or property gallery | JPG or WebP | Balanced; resize to the largest display size first |
| Email attachment | JPG or WebP | Balanced or Max compression when the size limit is strict |
| Social-media image | JPG or WebP | Balanced; preserve dimensions required by the platform |
| Screenshot with text | PNG | Keep PNG when sharp text matters; resize if necessary |
| Logo or transparent graphic | PNG or WebP | Preserve transparency and inspect edges carefully |
| Print or archival master | Original format | Keep an untouched original and create a separate compressed copy |
These are starting points rather than guarantees. Always review the output at the size at which people will actually see it.
JPG, PNG or WebP: which format should you use?
JPG
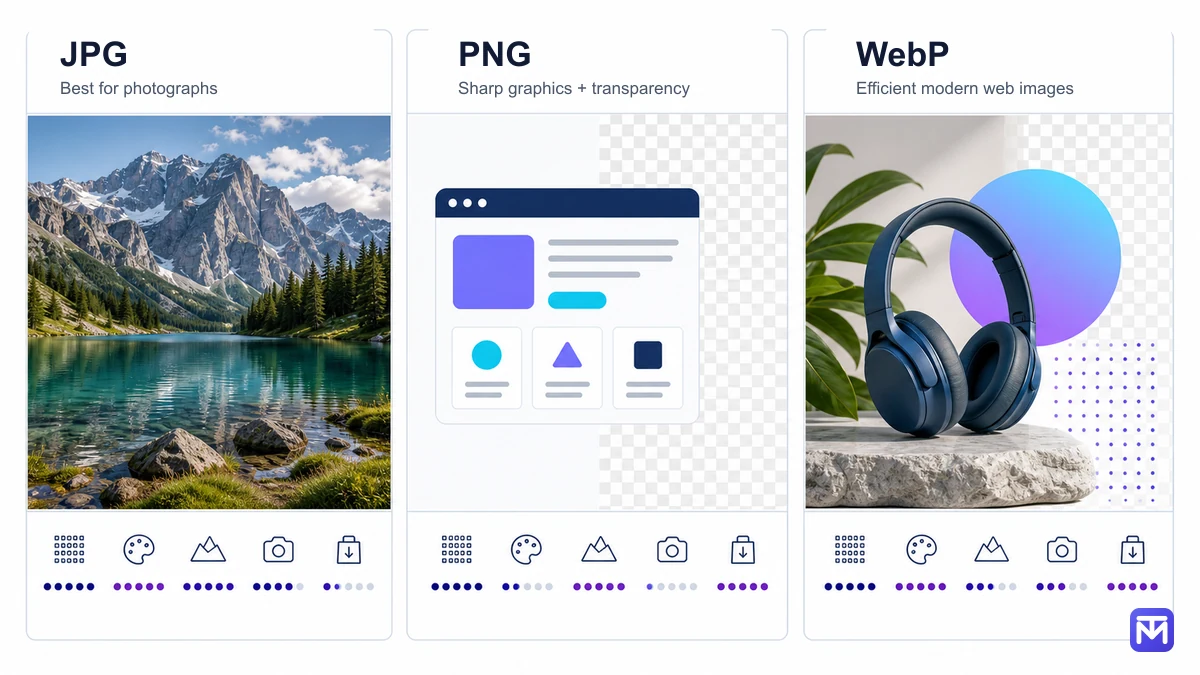
JPG is usually the most practical option for photographs. It uses lossy compression, which can create small files while preserving acceptable visual quality.
Use JPG for:
- property photography;
- product photos;
- blog covers;
- website banners;
- portfolio images without transparency.
Very low quality settings can introduce blockiness, halos and banding, especially around text, skies, shadows and skin tones.
PNG
PNG is lossless and is better suited to:
- screenshots;
- interface graphics;
- logos;
- diagrams;
- images with transparency;
- artwork with sharp edges and flat colors.
A photographic PNG may remain large because the format preserves every pixel. In ToolMint, the JPG and WebP quality control does not apply to PNG in the same way. If a PNG is still too large, resizing it or converting an appropriate photographic image to JPG or WebP may produce a more useful result.
Use the Image Format Converter when the current format does not match the image content.
WebP
WebP supports both photographic compression and transparency. It can often create smaller web images than JPG at a similar visible quality, although the result depends on the source and encoder settings.
WebP is a strong choice for modern websites, but confirm that the destination platform accepts it before converting a large batch.
Lossy versus lossless compression
Lossy compression
Lossy compression permanently removes some image information. JPG and many WebP outputs use this approach.
It is generally suitable for:
- website photography;
- social-media images;
- email attachments;
- listing photos;
- thumbnails;
- marketing assets.
The goal is not to remove as much data as possible. The goal is to reach a smaller file size while keeping visible artifacts below an acceptable level.
Lossless compression
Lossless compression preserves the image data exactly after decoding.
It is generally suitable for:
- screenshots;
- logos;
- UI graphics;
- diagrams;
- source files that require repeated editing;
- assets where every pixel must remain unchanged.
Lossless compression usually offers less dramatic savings for complex photographs. For that reason, it is important to match the format to the image rather than treating every file the same way.
How to check whether the compressed image still looks good
Do not judge the result only by the percentage reduction.
Use this review process:
- Compare the original and compressed versions at the final display size.
- Zoom to 100% and inspect faces, text, edges, gradients and shadows.
- Check for blockiness, color banding, smearing or ringing around high-contrast edges.
- Confirm that transparency is preserved where required.
- Verify that the dimensions still match the intended use.
- Test the file on the platform where it will be published.
- Keep the original image as a master copy.
For website work, test the live page rather than assuming a smaller image automatically solves every performance issue. Loading behavior also depends on caching, responsive image markup, lazy loading, rendering dimensions and the rest of the page.
Common mistakes when compressing 4K images
Compressing an already compressed file repeatedly
Repeated lossy compression compounds artifacts. Always create new outputs from the untouched original instead of reopening and compressing the previous export.
Using PNG for every image
PNG is excellent for screenshots and transparency, but it is often inefficient for full-color photographs. A property photo stored as PNG can be much larger than an appropriate JPG or WebP version.
Keeping unnecessary dimensions
Compression reduces file size, but it does not make excessive resolution useful. A 5000-pixel-wide image is still oversized when displayed at 700 pixels.
Resize first when the final use case does not require the original dimensions.
Selecting Max compression without reviewing the result
The smallest file is not automatically the best output. Strong compression may remove texture and create visible artifacts.
Use Auto or Balanced first, then move toward stronger compression only when necessary.
Deleting the original
Compression can be irreversible. Store the original file separately, particularly for client work, property photography, print assets and portfolio images.
Ignoring privacy
Some online image services upload files to remote servers for processing. This can be unsuitable for confidential screenshots, client photography or unreleased creative work.
ToolMint processes supported images locally in the browser. It does not upload or store the image contents, filenames or embedded metadata.
A practical workflow for website images
For most website images, follow this order:
- Choose the final placement. Determine the largest size at which the image will be displayed.
- Resize the image. Avoid serving thousands of unnecessary pixels.
- Choose the format. Use JPG or WebP for photos and PNG for graphics that require sharp edges or transparency.
- Compress a copy. Start with Auto or Balanced.
- Inspect the output. Check important details at normal size and 100% zoom.
- Publish and measure. Test the page with real performance tools.
- Keep the master. Store the original separately for future exports.
This produces more reliable results than applying maximum compression to every file without considering where it will be used.
Frequently asked questions
Does compressing a 4K image reduce its resolution?
Not necessarily. Compression can reduce file size while keeping the same pixel dimensions. Resolution changes only when the image is resized.
Can I compress a 4K image online without uploading it?
Yes. ToolMint performs compression locally in a compatible browser, so supported image files are not uploaded to ToolMint servers.
What image formats can ToolMint compress?
ToolMint supports JPG, JPEG, PNG and WebP. It does not currently support GIF, HEIC, AVIF, SVG or TIFF in the Image Compressor.
Can I compress several 4K photos at once?
Yes. ToolMint supports up to 20 images per batch, with a 25 MB limit for each file. The completed files can be downloaded together as a ZIP.
What is the best quality setting for a 4K photo?
Start with Auto or Balanced. For manual control, a JPG or WebP quality setting around 80–85 is a practical starting point for many photographs. Inspect the output and adjust according to the final use case.
Why did my PNG not become much smaller?
PNG is a lossless format and may not shrink significantly when the dimensions remain unchanged. Photographic PNG files may be better suited to JPG or WebP when transparency is not required.
Will ToolMint change the image format?
No. The Image Compressor preserves the original supported format: JPG remains JPG, PNG remains PNG and WebP remains WebP. Use the Image Format Converter when you need a different output format.
Will compression remove image metadata?
Canvas-based re-encoding generally does not preserve embedded metadata. ToolMint also provides an option to strip nonessential metadata. Keep the original file when metadata must be retained.
Compress your 4K image privately
A large image does not always need smaller dimensions, but it usually benefits from a deliberate export and compression workflow.
Start with the final use case, select the right format, keep an untouched original and review the result instead of chasing the smallest possible number.
Use the ToolMint Image Compressor to compress JPG, PNG and WebP files directly in your browser. It is free, requires no account, supports batch processing and keeps supported images on your device.